• Home
  • About
  • DIY
    • Accessories
    • Home Decor
    • Polymer Clay
    • This & That
    • Tips & Tricks
  • Contact
  • Shop

STUDIO ARTESANIA

facebook twitter pinterest instagram
Revamp old shoes
I have that thing for flat ballet pumps. We are in love since my childhood when I practiced ballet. Unfortunately, my dream of becoming a prima ballerina was not achieved, but the love for ballet and ballet shoes has remained to this day. I own several pairs of ballet pumps, and among them are brown ones that are very old and worn out. I love that shoes, but it's obvious that they had definitely seen better days. Even though they no longer looked particularly great and had been worn into submission, they are so comfortable that I had to save them and turn them into something gorgeous - the shiny silver flats. Here is what I did to makeover those shoes to be wearable again.

Materials and tools

Old shoes
White and silver acrylic paint
Semi-hard paintbrush
Silver glitter Eva foam sheet
Scissors
Pencil
Glue

Step 1.

Revamp old shoes
Before I start my shoe makeover I removed a ribbon bow that was sewn on the front. I encountered several problems during revamping these shoes. As I wrote earlier my shoes were brown and it would be much easier for me if I wanted to turn them into gold ones. But, gold is not my thing, at least for clothes so I would not have anything to wear them with. I wanted them to be silver. You see, the gold paint will cover brown after only two coating, but silver is looking for a light background that way I had to prepare them by priming in white. Since my shoes are made of fabric which looks like overturned leather firstly I tried to spray paint them with white textile paint, but they just got soaked and color did not want to stay. After drying, they were still brown. Then I decided on a different approach.
Revamp old shoes
I used white acrylic paint for priming. I applied two coats of white making sure to pull the brush in the opposite direction from the fabric grained texture and thus cover the entire visible surface, including upper edge of my shoes.

Step 2.

After both coatings of white acrylic paint were dried, which took about half an hour (15 minutes for each coating), in the same way, I applied silver acrylic paint. Again, I applied two coating.
Revamp old shoes
These shoes are not intended for walking in the rain, so acrylic paint is not in danger of spilling. Anyway, I tested them under a jet of water and the paint remained completely intact.

Step 3.

Revamp old shoes
I removed old dirty insoles and used them to make templates for the new ones. With the pencil, I traced the shape of insoles on the back of the foam sheet and cut them out with the scissors.
Revamp old shoes

Step 4.

Then I applied the adhesive (glue) to the back of the insole and placed it into the shoe. It's best to apply the adhesive gradually - from the heel to the toes, and gradually to put it into the shoe with the gentle pressure of your fingers.
Revamp old shoes
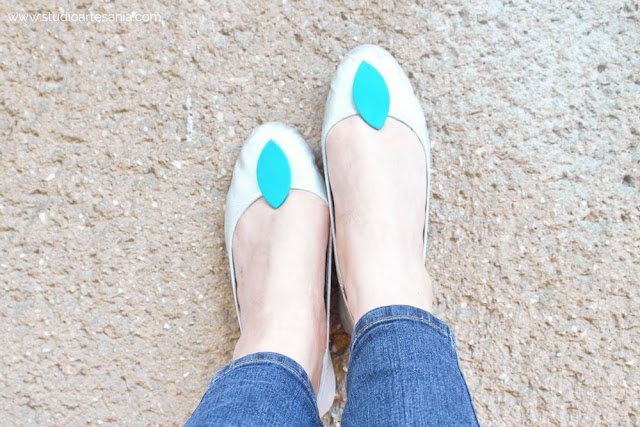
That way I was able to put the insole in the right place and correct the position when was needed. I left the shoes overnight so the glue can completely dry. To hide the traces of bows I put a decoration in front of the shoes. The process of making the decoration I will show you in the next tutorial. And, that's it! My new shiny silver shoes were ready for a walk.
Revamp old shoes
If you loved this DIY project, go ahead and share it with your friends on social media. Sharing will be much appreciated. And, if you revamped some of your favorite shoes show them to me on Instagram by using the hashtag #StudioArtesania.
Revamp old shoes
Share
Tweet
Pin
No comments
DIY Glitter Vases
I’m always on a lookout for interesting objects that could be repurposed and transformed into something else. This time I used some glass bottles I had and transformed them into cute glittering vases for my balcony. I’m particularly excited about this DIY project because it’s so quick and effective, and whatever you do it really can't go wrong.
DIY Glitter Vases

Materials and tools

Glass bottles
White spray paint
Glitter (light blue, light purple, and silver)
Mod Podge or decoupage glue
Cotton pads
Rubbing alcohol
Paintbrush

Step 1.

Before any crafting began, I prepared my bottles for painting. To remove paper stickers on the bottles I filled plastic washbowl with warm water, carefully placed the bottles inside and let them sit until water has cooled down. It took about 15 minutes. Then I thoroughly cleaned my glass bottles with warm soapy water, rinsed them well and allowed them to dry. Next, I moistened a cotton pad with rubbing alcohol and wiped over the entire glass surface. The rubbing alcohol assures me that any remaining dirt, grease or soap residue is washed away.
At last, I spray paint my bottles white. To learn how to properly spray paint different objects and materials please read my tutorial for faux metallic boxes. Anyway, I applied three coating of white spray paint to cover bottles completely and let them dry for about 30 minutes in between the layers.

Step 2.

I protected my working surface with a large piece of paper, so I can latter bent it and easily return the glitter into the package. You can use any type of glitter you want, but extra-fine glitter that can be found in the scrapbook section of an arts and crafts store will give you a more professional looking result.
Then I pour some glue into my crafting bowl. I took one bottle and cover the upper part of it with the glue. I applied glue with the brush and intentionally leave the streaks and strokes obvious in order to get the additional texture on pieces. But, if you do not want strokes to be visible use foam brush.
DIY Glitter Vases
After the first coat was dry I applied a second coat and then generously sprinkle light purple glitter all over the glue. The first coat of glue is a primer of the surface, while the second coat will keep the glitter in place. Avoid using tacky glue, school glue, or basic white glue because they are water soluble and will not last very long. If you want for the second layer you can apply the glue to only a small patch first. This way, the glue won't dry by the time you get around to glittering it, especially if you work on the large surface. Also, you can mix glitter into the glue, but then it's not sparkly as I wanted. Depending on what brand and what type of glue you use, drying can take anywhere between 20 minutes and several hours. Read the label on your bottle of glue for more specific drying instructions. My glue was dry in 20 minutes.
DIY Glitter Vases
From time to time I turned the bottle on its side and taped and shook it so an excess of glitter would fall off. After I covered with glitter the whole coating of glue I left bottle aside to dry. Now some bare spots become noticeable, so I'd take a thin paintbrush and carefully apply some more glue, shaken on some more glitter, then taped the excess off and again let to dry.
DIY Glitter Vases
In the same manner, I decorated the rest of my bottles. I wanted my design uneven, but if you want to be more precise you can create a straight line(s) with masking tape. If you want to use more than one color, choose one color to start with. Apply the second coat of glue to the areas with that color first. You'll add the other color(s) after the first one dries. If you want to create a fading or ombre effect, apply the glue to the entire area you want glittering. This will help the colors blend together.

Step 3.

After everything was dry I dusted off the excess of glitter with a dry fluffy paintbrush and that way prevent the glitter from shedding during sealing. Since my bottles will stay outside I wanted them to be durable, so I used the clear acrylic spray to seal the glitter. You can seal the glitter with the Mod Podge or decoupage glue, but it wants to be durable as an acrylic spray-on sealer. Make sure that you are using a sealer with a glossy finish. If you use a matte, semi-gloss, or satin finish, your glitter will lose its sparkle. That's it! The glittery vases are done. All you have to do is to place them where you want and to add some flowers.
DIY Glitter Vases
Sometimes crafting do not go as we planned, and that happened to me during this DIY project. I wanted to add blue glitter on my triangle bottle but I had run out of it, so, for now, it stayed bicolor. I would add the blue glitter latter when I get it. That's why I didn't seal that bottle yet. To decorate my balcony, whose walls are (as you can see on photos) painted in light blue, I added artificial flowers. I wanted to put purple flowers but I could not find any, so, until I do find them, I'll use some fuchsia ones that I already have. Oh, I almost forgot - you can insert some fairy lights into the bottles as well. Unfortunately, I could not manage to photograph my bottles during the night, but trust me - they look amazing with its subtle shine.
DIY Glitter Vases
If you loved this DIY project, go ahead and share it with your friends on social media. Sharing will be much appreciated. And, if you make some glittery bottle vases by this tutorial show them to me on Instagram by using the hashtag #StudioArtesania.
Share
Tweet
Pin
No comments
DIY Faux metallic storage boxes with colorful lids
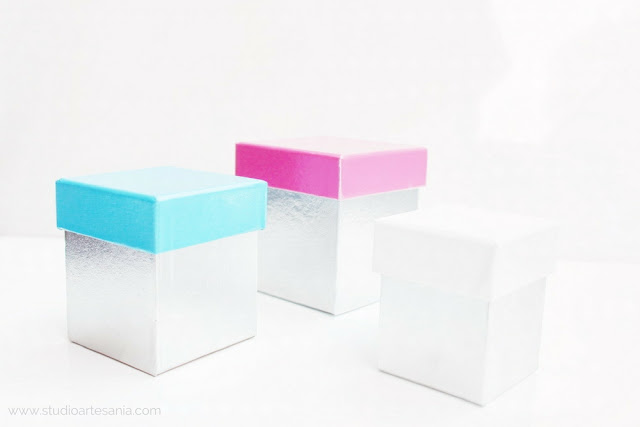
Here is yet another quick, cheap, super easy and multifunctional Do It Yourself Project. To make it I used only two things - cardboard boxes in varying size and spray paints. Both can be found in every craft store. I used silver chrome spray paint for the base (which was so hard to photograph), and white, pink and vivid blue for the lids. That way I add a bit of color to the cold reflective metallic feel. Of course, you can use the spray paints in colors you prefer the most.

Preparation for spray painting

Before I go into details how I painted the boxes I want to introduce you to some basics of spray painting. If you have long hair whenever you use spray paint firstly tie it into the bun or protect it with the old bandana. Wear old clothes, preferably with short sleeves, for which you will not be sorry if it gets splashed with paint. 
DIY Faux metallic storage boxes with colorful lids
You want to spray paint outside or in the well-ventilated area, such as a garage with an opened door. Protect your working surface with large garbage bags and/or with the several layers of old newspapers. Make sure you covered with bags and newspapers area larger than your object is so you can spray without worrying about your paint getting on anything else. If you work near walls, for example on the balcony, cover the part of walls with the garbage bag as well. Just secure it with painter's tape, or put a large piece of cardboard along the wall. You can use the large or medium-sized cardboard box as well for spray painting, but make sure to place the bag or newspapers in front of it. Also, prepare the smaller piece of cardboard or newspapers for testing the spray.
DIY Faux metallic storage boxes with colorful lids
Put your protective mask because you do not want to inhale the spray paint and you sure will when it starts to scatter. Wear protective goggles so paint can't irritate your eyes. Put on your gloves to prevent paint to color your hands. I use kitchen gloves that are longer than surgical ones and thus protect my hands almost to the elbows. If your hands got painted rub them with the rough side of the sponge for washing dishes, and wash them with soap and lukewarm water. That will remove the paint from your hand, but I will recommend you to use the gloves. And remember - do not use that sponge for dishwashing! Use it just for crafting.

How to spray paint

Separate lids and box bases, and put them close so you can grab them easily. Shake the can of spray paint according to instructions which are always on the back of the can. Then aim the can at the testing cardboard piece and gently press the sprayer on the bottle. This way you will check how much paint is coming out, how much it disperse and how far you have to remove the can from the object because every spray paint is different. You're now ready to start spraying!
Remember when spray painting to go light and to keep the bottle at least 10 cm (4 inches) away from the object you spraying. It’s better to have a couple thin layers of paint than to go crazy - that’s when you’ll get drips. So, spray with short light strokes, and work your way around the box until the entire surface is completely covered with paint. Then let the paint to dry. Depending on the weather it will take about 5 minutes if it's warm, or up to half an hour if it's cold outside. 
DIY Faux metallic storage boxes with colorful lids
Then repeat the light spraying. You should cover the object with paint in about two to three turns. Always let the paint to dry completely before you apply another layer, and do not forget to shake the spray bottle and test it before you start painting. If you want you can spray the inside of the box as well, but know that you should do it separately. First spray the inside and then outside of the box. To spray the lids you can place them on top of the plastic glass which allows you to turn them without messing the paint and easy to dry them.
I primed the base of the boxes with one coating of the white spray paint so the chrome would be more effective and shiny. Also, I sealed the chrome with a coat of clear spray paint to be sure that my paint won’t scratch.
DIY Faux metallic storage boxes with colorful lids
And now you have beautiful storage in your home!
DIY Faux metallic storage boxes with colorful lids
If you loved this blog post, go ahead and share it with your friends! If you make these boxes show it to me on Instagram by using the hashtag #StudioArtesania!
Share
Tweet
Pin
No comments
Give your vase a spring makeover / Studio Artesania DIY
This is one of those Do It Yourself Projects that is great on style but light on the budget. What I like most about it, except that the used materials are not expensive, is the unlimited possibilities of design, as well as the ability to make a beautiful decoration from something unpleasant to the eye. It's great to hide ugly old vase or plant pot, to give a spring makeover to your favorite vase, to reuse the empty can that you would throw away, or to quickly make a vase from the glass. The possibilities are endless. All you have to do is to choose your paper straw color and pattern and spend about 15 minutes of your time to turn them into the cute home decor.
Paper straws are very cheap, and there are so many colors and patterns options. In this tutorial, I will show you two different ways to use those straws. The end result is much the same, but the way of the application is completely different so you can choose the approach that suits your need the most.

Bluish green vase with the white dots

Give your vase a spring makeover / Studio Artesania DIY
I have few vases, but my favorite is high glass vase that you can see on pics of several of my DIY projects. But, from time to time I like to give it a new look and decorate (change) it a bit. Since I don't want to make those changes permanent, I came with the solution that can be easily removed when I do not need or want that decoration anymore. The solution is removable vase cover, and here is how to make it.

Materials and tools

Paper Straws
Double-sided tape
Vase, glass or jar
Thicker paper
Scissors
Ruler
Tailor's meter
White paper ribbon

Step 1.

Give your vase a spring makeover / Studio Artesania DIY
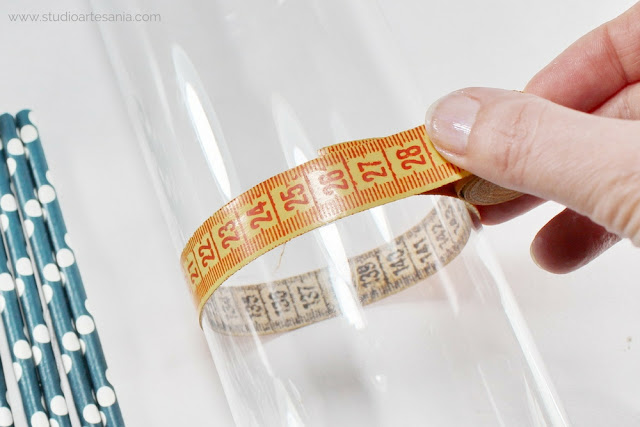
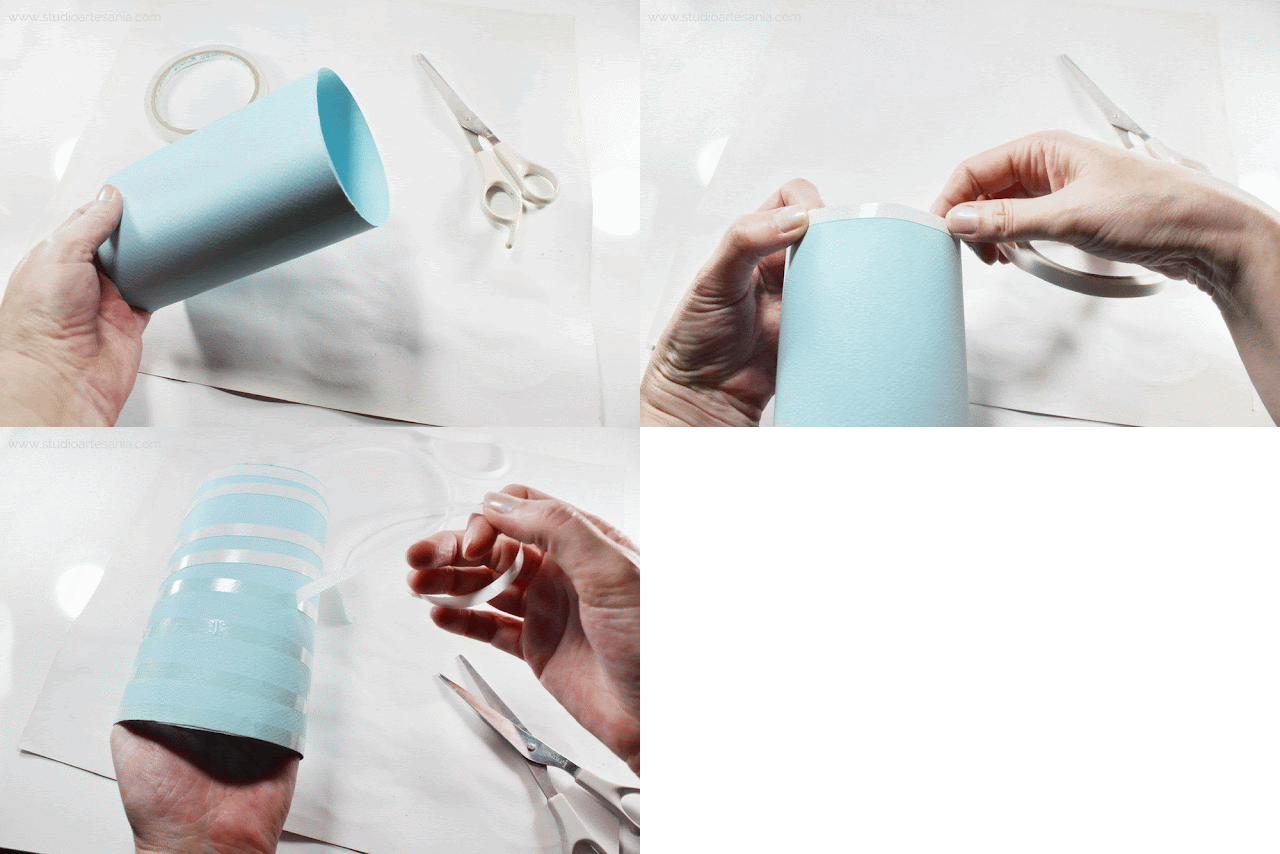
Measure the volume of the vase, larger glass or the jar you want to cover. Take the thicker paper, measure and mark required length with additional 10 cm (4 inches) for bending. The volume of my vase is 26 cm (10 inches), so I measured the length of 36 cm (14 inches) but also marked appropriate length. The straws are 20 cm (8 inches) long, so in order to paper would be invisible the height should be about 15 cm (6 inches). Cut the shape of paper base with the scissors. It's important that paper edge that will go into the bottom of the vase is straight until you do not have to pay much attention to the upper part that later will be covered.

Step 2.

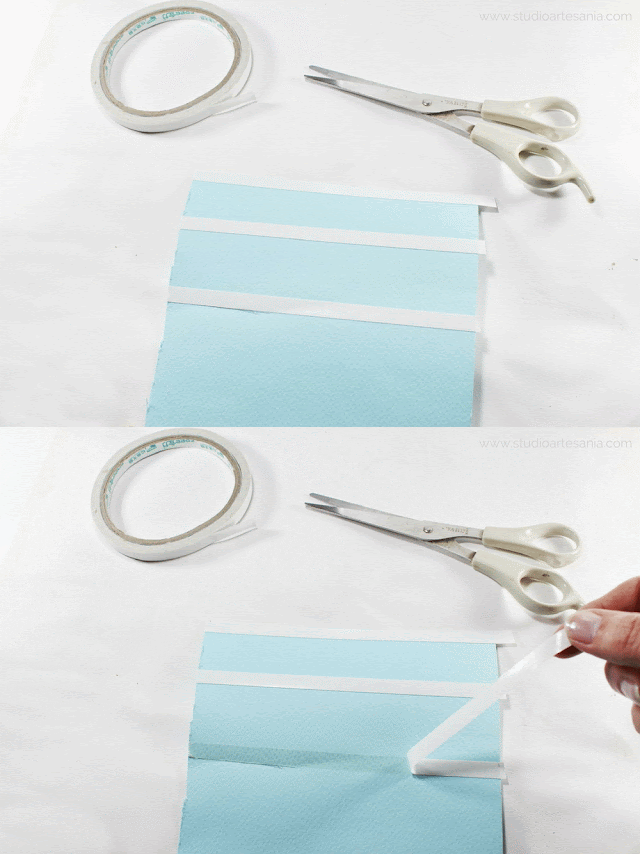
Place the stripe of the double-sided tape on additional part of the paper close to the mark of appropriate length (in my case on 26 cm/ 10 inches). Place another stripe of the tape on the edge of the paper, as well the third one in the middle. Remove the protective paper so that the tape is sticky on the other side.
Give your vase a spring makeover / Studio Artesania DIY

Step 3.

Carefully bend the paper, align the edge with the marked line, and glue everything in place. The additional part of paper should be inside of the tube which will be wide enough to place your vase, glass or jar. Cover as much of the tube surface with the double-sided tape, making sure that the edges of tape and paper are aligned.
Give your vase a spring makeover / Studio Artesania DIY

Step 4.

Then stuck paper straws onto the tape. Firmly press every straw, so it sticks well. Make sure that the edges of the straws are aligned, as well that the straws are close to each other. For vase large as mine you will need two straw packages of 25 pieces.
Give your vase a spring makeover / Studio Artesania DIY
The great thing about this approach is that whenever you want you can remove the straws and stick other ones with different pattern or color onto the paper base. Just gently peel them off, and stick others in different color and pattern. Save the removed straws for another DIY project, but do not use them for drinking.
After few peeling and sticking the tape will no longer be strong, so just add several new stripes of double-sided tape on the base. If you don't want to change the design, you can attach the straws on the base with the paper glue. In that case, you should wait for the adhesive to dry before use of cover.

Step 5.

Give your vase a spring makeover / Studio Artesania DIY
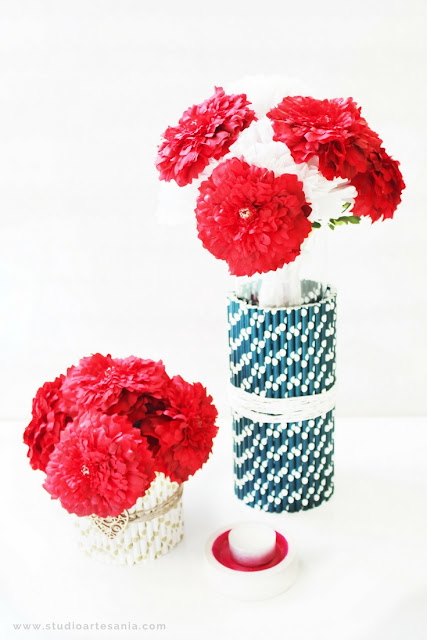
To further secure the straws wrap and tie them with the white paper ribbon. Insert the vase inside the base, and put in your favorite flowers.
You can use this cover for different vases, just make the base wide enough for all of them. You can cover with it the glass or ugly jar, and that way gets an interesting vase. After you finish to use it as a vase cover you can place inside fairy lights and use it as a lamp.

White vase with the gold dots

Give your vase a spring makeover / Studio Artesania DIY
My cat Zvrle loves to eat certain types of food that are packed in cans. As an ecologically conscious being, I like to upcycle those cans, and this is just one of the project I made with them. This is, also, one of those multifunctional projects I love to make, because it can be used as pen or brush holder, a decorative pot for succulents, spices, and other plants, as a candle holder and as a vase for real or artificial flowers. You can use any can regardless of the size and depth, and there are instructions how to decorate them with the paper straws.

Materials and tools

Paper Straws
Hot glue gun
Can
Pliers
Jute Twine
Heart shaped wood sticker (optional)

Step 1.

Give your vase a spring makeover / Studio Artesania DIY
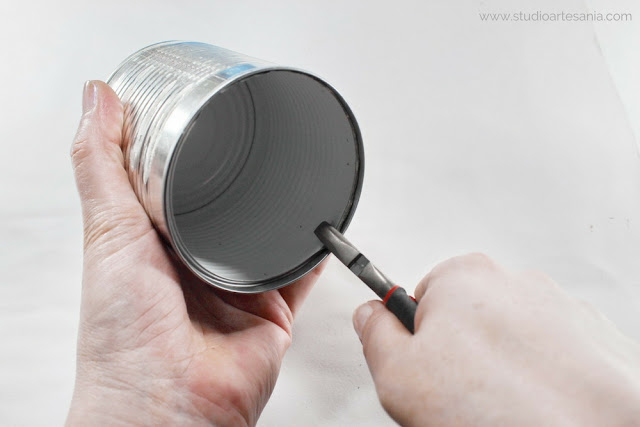
Remove the label from the can and clean it nicely. With pliers squeeze the sharp edges inside it. If you need, process edges additionally with a hammer to make sure that you can’t be injured on it.

Step 2.

Give your vase a spring makeover / Studio Artesania DIY
Measure and cut the straws. You want them to be slightly longer than the can is. Since the straws are 20 cm (8 inches) and the can I used is 8 cm (3 inches) long, I cut off straws in half (10 cm/ 4 inches). For can large as mine you will need one straw package of 25 pieces. After you finish cutting, stack the straws so that the cut part is one to the other. The cut part of the straw is slightly crushed, so you will easily recognize it. Do not worry if your straws are uneven, that just adds up to the design.

Step 3.

Give your vase a spring makeover / Studio Artesania DIY
Use the hot glue gun to place glue at the can. Quickly, before the glue hardens, place and firmly press the straw onto the can where you placed the glue and hold for a few seconds. Make sure that the cut part of straw is on the bottom of the can, as well that they are nicely leveled.

Step 4.

Give your vase a spring makeover / Studio Artesania DIY
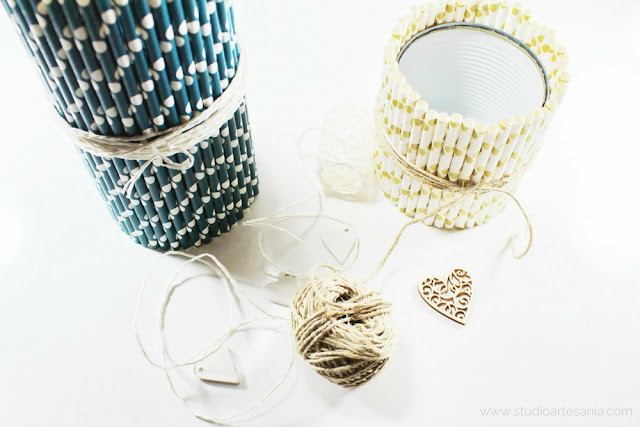
To add a bit more interest to this sweet thing I wrapped and tied some jute twine around the middle of the white vase with the gold dots. I added a wooden heart sticker on it to hide the knot. Insert glass with the water and add a flower bouquet. You can also fill it with your favorite artificial flowers or put inside the plant in the pot.
Give your vase a spring makeover / Studio Artesania DIY
If you loved this blog post, go ahead and share it with your friends! And, if you recreate any of these DIY's please show it to me by using the hashtag #StudioArtesania!
Share
Tweet
Pin
No comments
DIY Multifunctional industrial-style round coasters
I love to design and create multifunctional objects. You know, the objects that you can use for multiple purposes, and these industrial-styled coasters are one of those. They will not only protect your table while looking stylish, but they can also serve as candle or paper holders, or for storing small things like keys, jewelry, staples. 
They can be put on top of each other and used as minimalist sculpture. They can be arranged in various ways - the bottom at the bottom, the top along the top, the bottom along the top - to create different shapes of sculpture. And, depending on the mood, you can put a different color on top every day. They are fun and gorgeous multifunctional objects. 
DIY Multifunctional industrial-style round coasters
To make them it will take you a few hours, and you need the materials you probably already have in the house. The only tricky part is to find a perfect plastic container for the mold. You will need a plastic container with the raised bottom sufficiently wide to hold your glasses. I reused a package of my favorite hummus. Look for a similar package of yogurt or some kind of spreads that suits your glasses.

Materials and tools

Plaster of Paris
Cotton pads
Vegetable oil
Water
Mixing bowl
A plastic container as a mold
Spatula
Sandpaper
Acrylic paints
Paintbrushes

Step 1.

DIY Multifunctional industrial-style round coasters
Apply a small amount of oil on a cotton pad and rub the mold with it. Make sure that you do not pour a lot of oil, but just enough to make very, very thin layer of grease on inside of the container. That will help you later to get out plaster object from the mold.

Step 2.

Mixing plaster is very easy. For the measurements be sure to follow the directions on the package of the plaster you use. For my mold, I used 3 tablespoons of powder and about half a milliliters of water. It's easiest if you pour water into the plaster very slowly and mix as you pour. You will continue mixing until your plaster is the consistency of (American) pancake batter. 
DIY Multifunctional industrial-style round coasters

Make sure that your mixture is smooth and without any lumps. Once the plaster is right consistency you are ready to pour. You have about 5 minutes to work with the mixture, so have your mold ready and close by.

Step 3.

You can slowly pour the plaster into the mold, but for this project, I find that is easier to gradually add plaster mixture into the container. I used a spatula to pour a small amount of plaster and then vibrate it (shake it quickly left and right with hand). 
DIY Multifunctional industrial-style round coasters

Tap the container few times on desk to extract trapped air, and then add more mixture until you satisfied with the thickness of the coaster. Again vibrate it and tap it on the desk to rid the air. You will notice air bubbles appearing on the surface. They will go on their own after shaking and taping the mold, and the surface will again become smooth. Leave it aside to tighten which will, depending on plaster you use, take for about 10 to 20 minutes.

Step 4.

DIY Multifunctional industrial-style round coasters
Turn the mold, press it lightly with your fingers if necessary, and the object will slip out of the mold. Set aside to fully dry. Plaster takes about half the hour to hour to set, but to fully dry I recommend you to let it sit overnight.
Repeat all the steps to make more coasters. To make sure that all coasters are the same thickness before you take out the first one from the mold mark its thickness. Just draw the line on the container with the marker, and when you make next coaster you will pour plaster up to the mark.

Step 5.

Although vibrating and taping have helped to have the flat bottom of the coaster, it is not completely flat. Some of the coasters may have uneven edges as well. Therefore, sanding is mandatory. Take a larger sheet of sandpaper and in a circular motion correct any irregularities on the bottom of the coasters. Also, round those edges. For edges, I used my trusty nail file. Remove the dust on coasters with paper towels.
DIY Multifunctional industrial-style round coasters
During this step, please, wear the protective mask because you do not want to inhale the dust. Place the old newspaper or larger sheet of baking paper on the table so you can easily remove the collected dust.

Step 6.

Mix acrylic paints and carefully paint an inner circle of the coasters in your favorite colors to create depth and a 3D effect. You can use one color or a different one for each coaster. I used yellow, magenta, green and blue. 
DIY Multifunctional industrial-style round coasters

Using a different color for each coaster is a great way to avoid mixing glasses. Set aside to dry. It will take about 20 minutes. That's it! Your brand new coasters are ready!
DIY Multifunctional industrial-style round coasters
Oh, and if you enjoyed this tutorial do not forget to show your love by sharing.
Share
Tweet
Pin
No comments
DIY Ombre texturized triptych painting
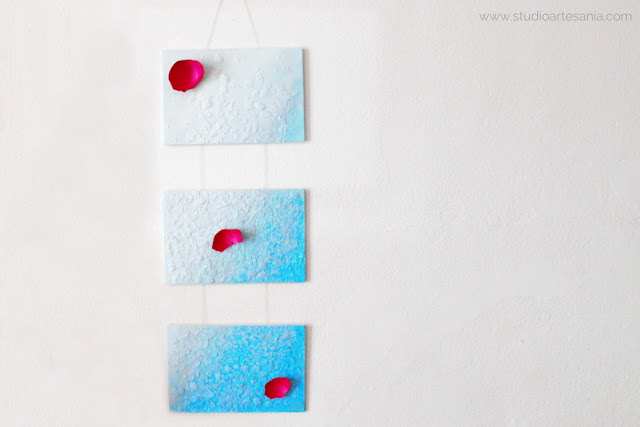
How many times you had eggs for breakfast or used them for cake making and had just thrown those eggshells without even giving them any thought? If your answer is often, that's really a shame because eggshells can be used in many ways to create cute and beautiful things. You can even create a unique kind of art, such as this triptych painting, with them.
DIY Ombre texturized triptych painting
Traditionally, eggshell mosaics are made by first dying then positioning each piece individually. It's a time-consuming and delicate process. This project is total opposite - it's easy, relatively quick, and suitable for all ages and skill levels. If you do not eat the eggs but want to make this piece of art, ask your relatives and neighbors who consume them to collect for you the eggshells that they would normally throw.

Materials and tools

Eggshells (white or brown)
3 Canvas panels
Acrylic paints (white, turquoise blue, fuchsia)
Pentart antique paste silver
Tacky glue
Painter's tape
Double sided tape
Baking paper
Sccisors
Pencil
Ruler
Paintbrushes
Kitchen cloth
Paper towels
Bowl of water
Silver sting wire (0.38 mm/0.15 inches)
Hot glue gun

Step 1.

DIY Ombre texturized triptych painting
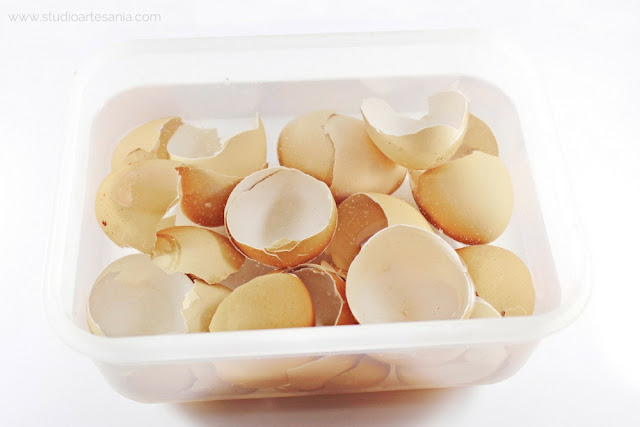
For this project, you'll need shells of fresh eggs, not boiled ones. Wash the eggshells and put them in the plastic container. Add water and let the shells to soak for minimum 3 hours. It's best to leave them to soak overnight.
The amount of eggshells you need for this project is depending on the size of your canvases. Although I prepared more I used shells from about 10 eggs for this triptych.

Step 2.

DIY Ombre texturized triptych painting
After soaking remove the white membrane in the shell. The membrane will come out easily due to soaking. If some of the shells broke during the removing of membrane keep those pieces as well.

Step 3.

DIY Ombre texturized triptych painting
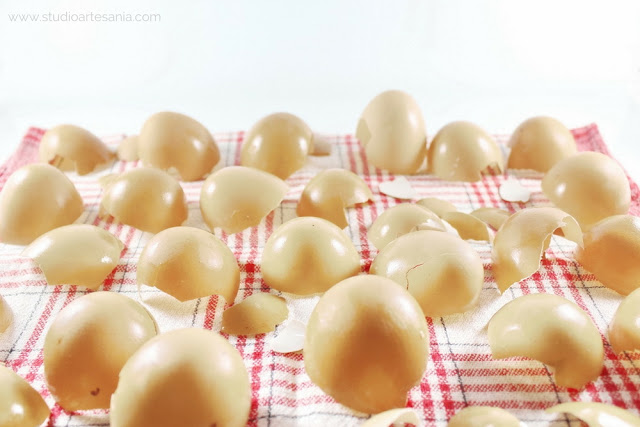
Rinse the shells again and spread over kitchen cloth to completely dry. It will take few hours for this, so I usually leave them to dry overnight. After drying collect the shells and place them into the bowl.

Step 4.

For this painting, you can use regular stretched canvases but canvas panels are better. I choose canvas panels in dimensions 12x18 cm (5x7 inches). Making of this painting is a really messy job, so protect your work surface with the cardboard or thicker layer of newspaper.
DIY Ombre texturized triptych painting
Turn the panels so its back is facing you. Place them at length close to each other and tape them with painter's tape so they are stick together. With scissors remove any excess of tape protruding from the canvases edges.

Step 5.

DIY Ombre texturized triptych painting
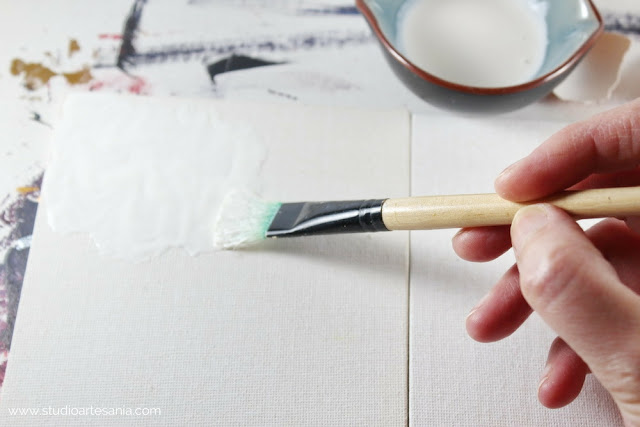
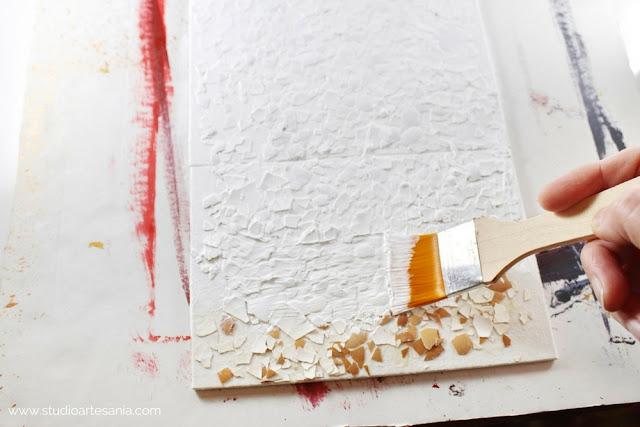
Turn back panels on the right side, and with the brash apply a thicker layer of the tacky glue on part of the canvas. Crunch few shells into smaller pieces and place them onto the glue. You can just scatter the pieces of the shells onto the canvas or place them precisely in the desired places. Continue applying the glue and the pieces of eggshells until you cover the entire surface of canvases.
I wanted to fully texturize lower parts of the painting and have texture only in a certain place on the first canvas. So, on two lover panels I'd scattered eggshells all over the entire surface, and on upper canvas, I place them precisely in certain places. Do not forget to wash your brush when you finish.

Step 6.

DIY Ombre texturized triptych painting
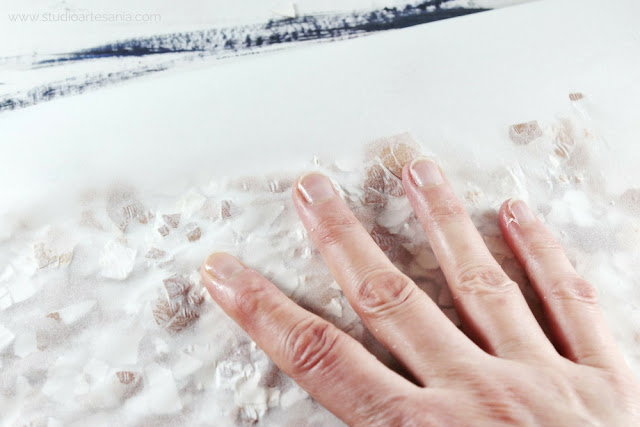
Place the large piece of baking paper over panels and press everything well with your hands to flatten eggshells even more. Some of the pieces of shells will crack or move, but do not worry about that. When you feel under your palms that all surface is flat and smooth carefully remove the baking paper. 
DIY Ombre texturized triptych painting

Then carefully separate the joint between the two panels, but do not remove the masking tape. Gently push the pieces of eggshells that protrude on the joints inside the panel. Repeat on another joint. Put back the panels in right position, and leave them to dry overnight. If you want to speed up the drying process you can use a hairdryer.

Step 7.

DIY Ombre texturized triptych painting
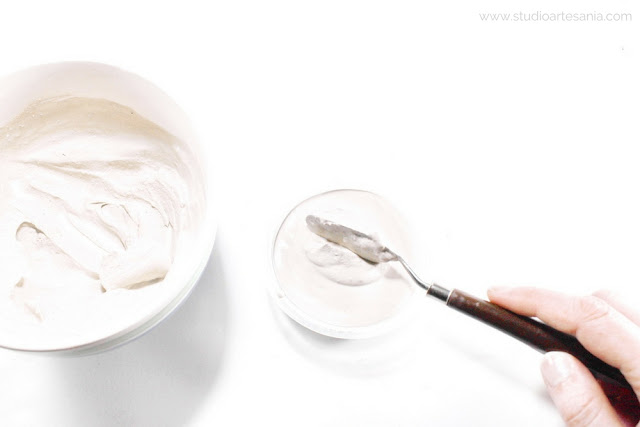
Directly from the tube squeeze out the white acrylic paint on the canvas and with a wide brush cover the surface of all panels although you used white eggshells. Do not overdo it with the amount of paint, but again you have to put enough of it to cover entirely all three panels, including the recesses between the eggshell pieces.

Step 8.

DIY Ombre texturized triptych painting
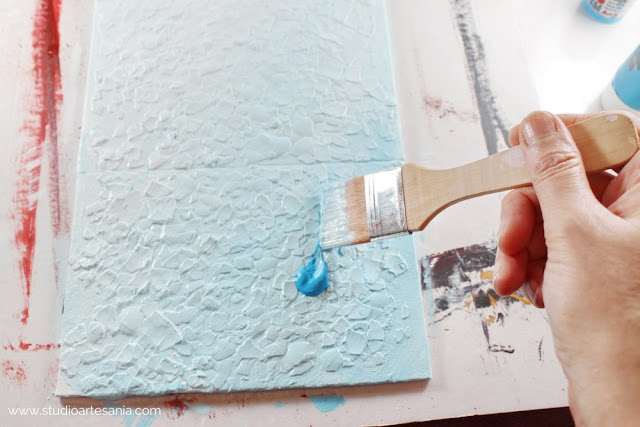
Directly from the tube squeeze a small amount of the turquoise acrylic paint on the down part of the canvases, and spread it diagonally on half of the surface. With brush gradually blend colors, keeping your strokes diagonally, until you get ombre effect from darker turquoise in the bottom right corner to white in the upper left corner. If necessary, add more paints (white or turquoise) on desired spots. Blend the additional paint by pulling the brush in diagonal directions.
You do not have to clean the brush when switching to another color of paint because the mixing will be more effective. But, from time to time you'll notice that the brush has picked up a lot of paints, and then wipe it with paper towels to remove excess paint. To make blending easier you can occasionally wet the brush with a bit of water.
DIY Ombre texturized triptych painting
During the blending cover the sides of the panel with paint. Again carefully separate the joints without removing the painter's tape and paint the inner sides of panels. Place the separated canvases on the corner of a table or on the top of the large vase so the joints do not touch and let to paint dry completely. Acrylic paint is dried quickly, but to be completely sure that paint is dry since we use a thicker coating and add a bit of water, it is best to leave the canvas on the side for several hours. To speed up the drying process you can use a hairdryer. Do not forget to wash your brushes.

Step 9.

DIY Ombre texturized triptych painting
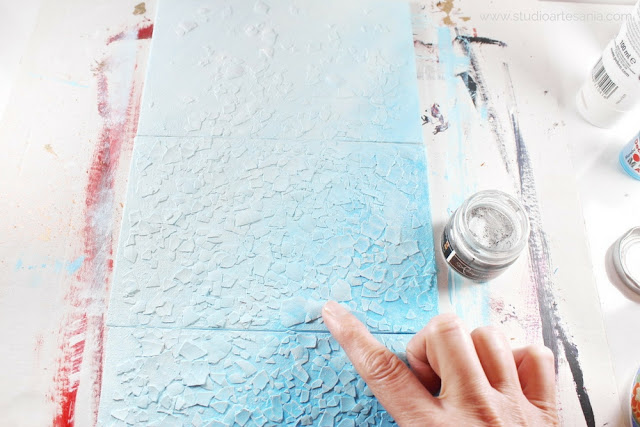
After the paint is dry, connect the joints again so you have one large canvas to work. Gently rub the silver antique paste on eggshells, especially on the darker turquoise blue part of the painting. That way you will add a bit of shine on paint, and those shells will have a look of the pearls. I love to use my index finger to apply paste since it gave me more control of the amount I use and application, but if you do not want to get your hands dirty you can use a brash. Do not overdo it with antique paste, you only want a little bit to emphasize those shells. Let the canvases aside for a little while so the antique paste gets dry.

Step 10.

DIY Ombre texturized triptych painting
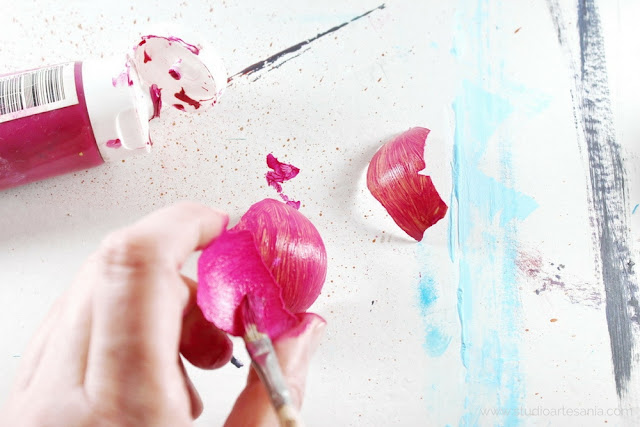
While the paste is drying take three larger pieces of eggshells and paint them on both sides with fuchsia acrylic paint. You will easier paint the white eggshells, but for brown ones, you'll need to apply two layers to cover them completely. Let them dry between every layer.

Step 11.

Measure and cut a string wire about 10 cm (59 inches) long. I used 0.38 mm (0.15 inches) string wire, but you can also use a thicker wire if you want it to be more noticeable. The wire I used is almost invisible on the wall, but it's still strong to hold all the panels. Also, panels I used are smaller ones and they are not too heavy, so if you use larger panels which are a bit heavier it will be better to use thicker wire.
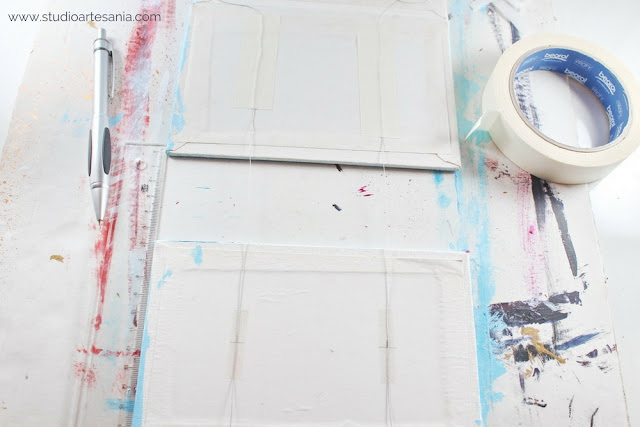
Turn the panels on the back, and remove the painter's tape on joints. Using ruler measure 5 cm (2 inches) on each side of the panel in length and mark it with the pencil. Cut small pieces of double-sided tape and glue it onto the marked spots on the panel making sure that the mark is in as much as possible in the middle of the tape. Repeat for other panels.
DIY Ombre texturized triptych painting
Connect both ends of the wire to get two strips of the same length, but do not bend the joint completely. Measure about 10 to 12 cm (3.9 to 4.7 inches) on each side of the joint, lean against the edge of the first panel and stick rest of the wire to the tape. Use marks to keep the wire straight as possible. Then secure the wire on the place with hot glue and cover it with a piece of painter's tape. With a ruler measure a 6 cm (2.3 inches) gap between the two panels, gently tighten the wire and stick it to the tape. Secure it with the hot glue and painter's tape. Repeat the procedure of measuring, sticking, hot gluing and securing the wire for the third panel. Cut off excess wire and secure its ends with painter's tape. The hot glue and painter's tape is strong enough to keep the wire in place after you hang the painting.

Step 12.

DIY Ombre texturized triptych painting
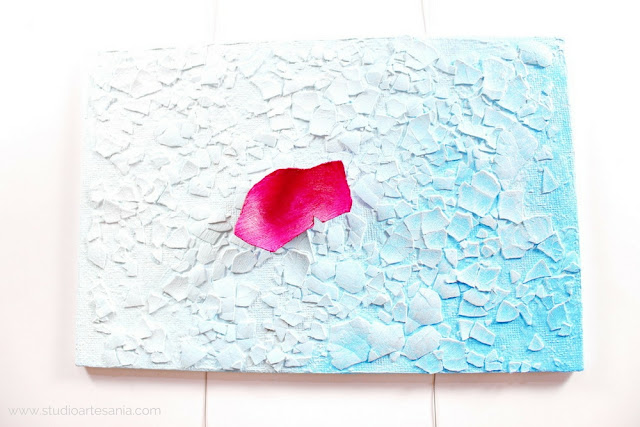
Turn the painting on the right side again. Apply a small amount of tacky glue on the back of the fuchsia eggshell, and with the gentle pressure of the finger so the shell does not break place it in the desired position. Repeat for other two fuchsia eggshells, and leave to dry for a couple of hours. 
DIY Ombre texturized triptych painting
If you don't want to wait you can use the hot glue gun. Just apply a dollop of the hot glue on the back of the eggshell, position it on the painting, press gently with the finger, and hold it for few seconds until glue become hard. That's it! Your ombre texturized triptych painting is ready to hang it on the wall.
DIY Ombre texturized triptych painting
If you like this tutorial share it on your favorite social network by clicking the buttons down below.
Share
Tweet
Pin
No comments
Older Posts

HEY There!

About Studio Artesania

I'm Anya! I’m so happy you are here. I’m artist & crafter that thinks that everyone can and should take the time to make things every now and then. I love to share ideas and hopefully inspire others to create. Want to know a little more? Check out the about me page.

Follow

Join The Mailing List

About Studio Artesania

Featured Post

DIY Glitter Vases

Labels

Accessories DIY Home Decor Polymer Clay This & That Tips & Tricks

Reader favorites

  • What is liquid polymer clay and how to use it?
  • How to cure liquid polymer clay with a heat gun?
  • How to use Fimo varnish on polymer clay?
INSTAGRAM @STUDIOARTESANIA

LEGAL INFORMATIONS

Created With By BeautyTemplates

© Copyright 2025 Studio Artesania

All rights reserved